The Forbidden Land, Eureka Pagos
- See also: The Forbidden Land, Eureka
The Forbidden Land, Eureka Pagos
- Level
- 70 (Sync: 70)
- Item Level
- 0 (Sync: 300)
- Elem. Level
- 20 (Sync: 35)
- Difficulty
- Normal
“Though they have yet to determine how such a thing could even be possible, the expedition is nevertheless certain that the place they have dubbed Eureka is none other than the Isle of Val, previously believed to have been obliterated by a powerful magick. Having completed their survey of Anemos, the expedition now turns its sights to a new region: Pagos, a mountainous frozen waste filled with untold dangers...
— In-game description
The Forbidden Land, Eureka Pagos is a level 70 field operation introduced in patch 4.36 with Stormblood.
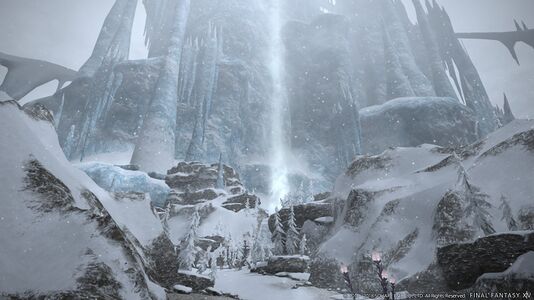
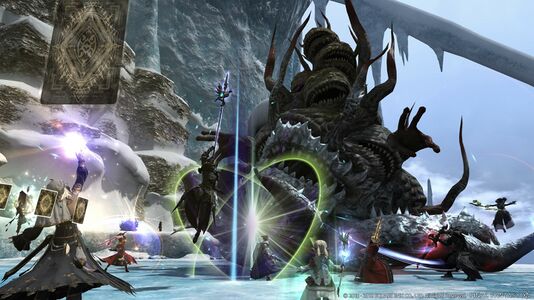
It is the second of four areas in The Forbidden Land, Eureka, and is a snowy, mountainous region. The layout and enemies in this zone are much more treacherous than in Eureka Anemos, requiring players to reach some points of interest by traversing narrow passages and occasionally by dropping off cliffs. In addition, lower-level players must avoid waking sleeping Frozen Void Dragons that block several areas, or they will be quickly killed.
Requirements
- Level Requirement: Disciple of War or Magic level 70
- Item Level Sync: 300
- Elemental Level Sync: 35
- Party Size: One to eight players
- While up to 144 players can simultaneously be in the instance, only party sizes of up to eight players are allowed. Players can freely join or leave parties inside the instance, but Party Finder is disabled.
- Role Restrictions: None
- Time Limit: 180 minutes
- The instance timer is specific to each player and commences upon entering the duty.
- Unrestricted Parties not allowed
- Limited Jobs not allowed
To enter The Forbidden Land, Eureka Pagos, you must first complete ![]() And We Shall Call It Pagos and the The Forbidden Land, Eureka Anemos story line.
And We Shall Call It Pagos and the The Forbidden Land, Eureka Anemos story line.
Unlock
- Quest: And We Shall Call It Pagos
- Level: Disciple of War or Magic level 70
- Starting NPC: Rodney
- Starting NPC Location: Kugane (X:8.5 Y:14.2)
- Prerequisite: Players must first complete the story of The Forbidden Land, Eureka Anemos.
Locations
| Area | Points of Interest |
|---|---|
| Icepoint |
|
| Heartbreak Holt |
|
| Squib Sands | |
| The Cones | |
| Frozen Lake |
|
| The Val River Belly | |
| Brushtip Gap |
|
| Hot Water |
|
| Agaric Rock |
|
| Corse Rise |
|
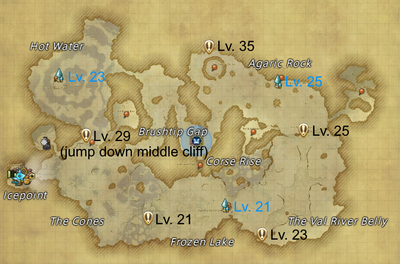
Players must attune to each aetheryte shard in order to travel to it, including the starting aetheryte in Icepoint.
- The south aetheryte (Vlondette's Retreat) is unlocked at elemental level 21.
- The northwest aetheryte (Geothermal Studies) is unlocked at elemental level 23.
- The northeast aetheryte (Gravitational Studies) is unlocked at elemental level 25.
Cliffs
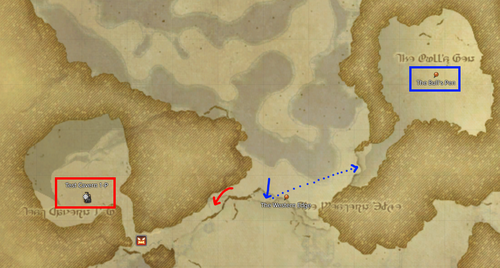
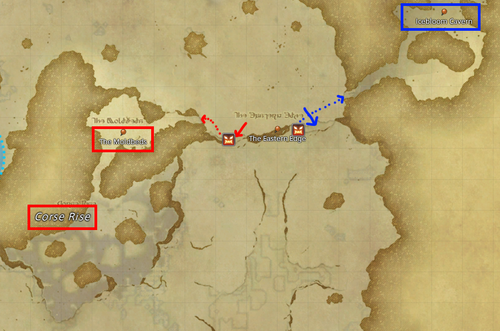
Several locations can only be accessed by dropping down cliffs.
- Tips:
- When dropping down, make sure not to be in combat, including having no enemies chasing you (i.e. no enemies in the enmity list), or the fall damage will be lethal. It will normally leave you at 1 HP when out of combat.
- The eastern cliffs contain sleeping dragons immediately after dropping off. Make sure to be walking, not running, when dropping off, or the dragons will immediately wake and kill you in one hit after the fall damage.
- As the cliffs are relatively narrow, be careful during the drop off or you will miss it entirely. Slowly walk off the edge and do not jump off.
The following images show the locations of the drop-offs.
- Solid arrows denote drop-offs
- Dashed arrows denote passages not visible on the map needed to reach the areas of interest after dropping off the cliff.
 icons denote the locations of Frozen Void Dragons.
Western Cliffs
- Closest aetheryte: Geothermal Studies
- Test-Cavern 1-P contains the Crystal Forge, which is needed to exchange vitiated aether in the player's Eurekan kettle for Frosted Protean Crystals. Be aware of the sleeping dragon near the entrance to the cavern.
- The Bull's Pen contains the location of the
 Brothers (Mindertaur and Eldertaur) notorious monster battle and its requisite spawn mobs. The cliff needed to access this area also contains Ejika Tsunjika during the elemental level 29 quest, who will be marked on the map.
Eastern Cliffs
- Closest aetheryte: Gravitational Studies
- The Moldbeds contains the location of the
 Eye of Horus (Horus) notorious monster battle and its requisite spawn mobs. Past the cavern is an outdoors area (Corse Rise) containing the location of the
  Eye Scream for Ice Cream (Arch Angra Mainyu) notorious monster battle and its requisite spawn mobs.
 - Icebloom Cavern contains the location of the
 Louhi on Ice (Louhi) notorious monster battle and its requisite spawn mobs.
Quests
Similar to Anemos, Eureka Pagos contains a short storyline that must be completed to progress. These do not show up in the Journal, and quest objectives will not be marked in the minimap.
| Elemental Level | Solution | Unlocks |
|---|---|---|
(On Entry) |
Talk to Krile. | |
| Talk to Krile. Travel to the Cones (X:16.5, Y:28.8) and interact with the Depleted Aetherial Stream on the upper hill. Afterwards, return and talk to Krile. | ||
| Talk to Krile. Travel to the Val River Belly (X:26.7, Y:30.7) and interact with the Depleted Aetherial Stream. Afterwards, return and talk to Krile. | ||
| Talk to Krile. Travel to the Eastern Edge (X:30.9, Y:20.7) and interact with the Magicite. Also, inspect the nearby point of interest at (X:30.7, Y:21.0). Afterwards, return and talk to Krile. | Pagos Weapon upgrades (Gerolt) > Eurekan Kettle and vitiated aether ("light") collection | |
| Talk to Krile. Travel to the Western Edge (X:10.1, Y:21.4) and talk to Ejika Tsunjika. To reach this location, travel to Hot Water and and drop off the cliff at (X:10.1, Y:21.4). | ||
| Talk to Krile. Travel to the Fumarole (X:21.8, Y:12.4) and interact with the aether column. | Making the Most of Pagos |
Shops & Services
| Merchant Name | Merchant Location |
|---|---|
| Expedition Birdwatcher | (X:4.5, Y:24.4) |
| Expedition Liaison | (X:3.1, Y:24.3) |
| Expedition Provisioner | (X:4.1, Y:24.3) |
| Gerolt | (X:4.2, Y:25) |
Eureka Pagos FATEs
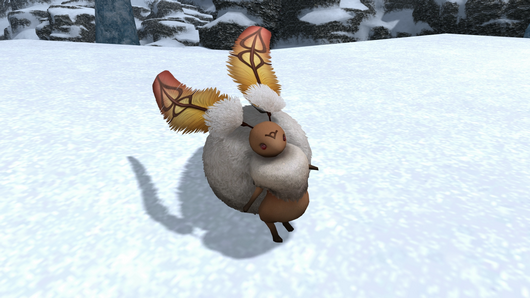
In addition to notorious monster battles, Eureka Pagos introduces a new type of FATE: elemental conflicts, where players defeat a few waves of enemies while protecting the resident Happy Bunnies. For more information, see Happy Bunnies below.
Among notorious monster battles, ![]() Morte Arthro (King Arthro, i.e. "Crab") and
Morte Arthro (King Arthro, i.e. "Crab") and ![]() Cassie and the Copycats (Copycat Cassie, or "Cassie" for short) are of particular interest, because they have a very low chance of dropping two accessories: the Blitzring and Cassie Earring, respectively, that provide a Haste bonus (faster global cooldown) within Eureka zones. These items can be sold for a premium on the Market Board. Because of their high value, players often may not wait for others to arrive before pulling them once they spawn. To maximize's one's chances of earning rewards, be near the FATE spawn area a few minutes before its cooldown resets and if the correct weather will occur. It is recommended to use a tracker if available for the instance, although some Eureka-oriented Discord servers have notifications for these and other high-value FATEs (these only notify an upcoming weather window; the cooldown is instance-specific).
Cassie and the Copycats (Copycat Cassie, or "Cassie" for short) are of particular interest, because they have a very low chance of dropping two accessories: the Blitzring and Cassie Earring, respectively, that provide a Haste bonus (faster global cooldown) within Eureka zones. These items can be sold for a premium on the Market Board. Because of their high value, players often may not wait for others to arrive before pulling them once they spawn. To maximize's one's chances of earning rewards, be near the FATE spawn area a few minutes before its cooldown resets and if the correct weather will occur. It is recommended to use a tracker if available for the instance, although some Eureka-oriented Discord servers have notifications for these and other high-value FATEs (these only notify an upcoming weather window; the cooldown is instance-specific).
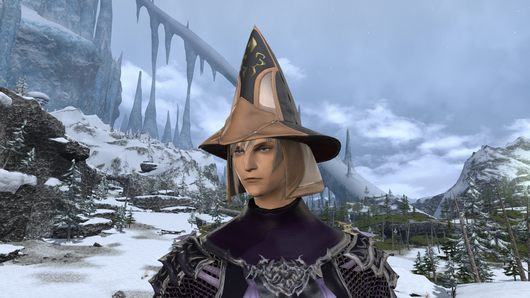
![]() The Wobbler in Darkness is also notable. The maximum rank one can achieve on the FATE is silver, preventing one from qualifying for the Optical Hat, unless if one uses a Hakutaku Eye Cluster on the boss, which is required to achieve a gold ranking. This item is crafted from materials that can be only obtained as rare drops from golden Happy Bunny treasure coffers, Cold-warped Lockboxes, or the Market Board, making it difficult or expensive to obtain. The hat is mostly a vanity glamour item: while it provides a Haste bonus in Eureka zones, it is outclassed by the Elemental Bonus provided by Elemental Armor +2.
The Wobbler in Darkness is also notable. The maximum rank one can achieve on the FATE is silver, preventing one from qualifying for the Optical Hat, unless if one uses a Hakutaku Eye Cluster on the boss, which is required to achieve a gold ranking. This item is crafted from materials that can be only obtained as rare drops from golden Happy Bunny treasure coffers, Cold-warped Lockboxes, or the Market Board, making it difficult or expensive to obtain. The hat is mostly a vanity glamour item: while it provides a Haste bonus in Eureka zones, it is outclassed by the Elemental Bonus provided by Elemental Armor +2.
| FATE | Notorious Monster | Location | Elemental EXP |
Tomestones |
Lockboxes/Crystals | Notable Rewards | Spawn Mob | Light |
|---|---|---|---|---|---|---|---|---|
| (Lv. 20) Down the Rabbit Hole | (X:18.2, Y:26.9) | 31,545 |
24 |
2 Pagos Lockbox |
None (0%) | |||
| (Lv. 20) Eternity | (X:21, Y:26) | 176,653 |
30 |
1 Pagos Lockbox 8 Pagos Crystal |
1 Yukinko Card |
Lv. 25 Yukinko | Feeble (21%) | |
| (Lv. 21) Cairn Blight 451 | (X:25, Y:28) | 216,904 |
36 |
2 Pagos Lockbox 9 Pagos Crystal |
Lv. 26 Demon of the Incunable | Feeble (22%) | ||
| (Lv. 22) Ash the Magic Dragon | (X:29, Y:30) | 234,076 |
45 |
2 Pagos Lockbox 10 Pagos Crystal |
Lv. 27 Blood Demon | Feeble (23.5%) | ||
| (Lv. 23) Conqueror Worm | (X:32, Y:26) | 260,995 |
51 |
3 Pagos Lockbox 12 Pagos Crystal |
Lv. 28 Val Worm | Gentle (26%) | ||
| (Lv. 24) Melting Point | (X:34, Y:21) | 283,962 |
57 |
3 Pagos Lockbox 14 Pagos Crystal |
Lv. 29 Snowmelt Sprite | Gentle (28%) | ||
| (Lv. 25) The Wobbler in Darkness | (X:28.5, Y:22.4) | 330,732 |
63 |
4 Pagos Lockbox 16 Pagos Crystal |
1 Optical Hat |
Lv. 30 Blubber Eyes | Gentle (33%) | |
| (Lv. 26) Does It Have to Be a Snowman | (X:17.4, Y:16.2) | 350,370 |
69 |
4 Pagos Lockbox 18 Pagos Crystal |
Lv. 31 Huwasi | Gentle (35%) | ||
| (Lv. 27) Disorder in the Court | (X:10.5, Y:10.5) | 385,619 |
75 |
5 Pagos Lockbox 20 Pagos Crystal |
Lv. 32 Wandering Opken | None (0%) | ||
| (Lv. 28) Cows for Concern | (X:10, Y:18.2) | 425,868 |
81 |
5 Pagos Lockbox 22 Pagos Crystal |
Lv. 33 Pagos Billygoat | Gentle (34%) | ||
| (Lv. 29) Morte Arthro | (X:8.5, Y:15.5) | 456,160 |
87 |
6 Pagos Lockbox 24 Pagos Crystal |
1 Blitzring |
Lv. 34 Val Snipper | Gentle (36%) | |
| (Lv. 30) Brothers | (X:14, Y:18.5) | 506,495 |
93 |
6 Pagos Lockbox 26 Pagos Crystal |
Lv. 35 Lab Minotaur | Bright (50+%?) | ||
| (Lv. 31) Curiouser and Curiouser | (X:21.1, Y:21.4) | 217,069 |
30 |
3 Pagos Lockbox |
None (0%) | |||
| (Lv. 31) Apocalypse Cow | (X:26, Y:17.1) | 564,380 |
99 |
7 Pagos Lockbox 28 Pagos Crystal |
Lv. 36 Elder Buffalo | Gentle (45%) | ||
| (Lv. 32) Third Impact | (X:31.4, Y:19) | 620,818 |
105 |
7 Pagos Lockbox 30 Pagos Crystal |
1 Behemoth Horn 1 Behemoth Pelt |
Lv. 37 Lesser Void Dragon | Bright (50%) | |
| (Lv. 33) Eye of Horus | (X:25.5, Y:20.2) | 686,004 |
108 |
8 Pagos Lockbox 32 Pagos Crystal |
1 Cold-warped Lockbox |
Lv. 38 Void Vouivre | None (0%) | |
| (Lv. 34) Eye Scream for Ice Cream | (X:24.4, Y:25.3) | 750,569 |
111 |
8 Pagos Lockbox 34 Pagos Crystal |
Lv. 39 Gawper | Gentle (45%) | ||
| (Lv. 35) Cassie and the Copycats | (X:22, Y:14.5) | 825,626 |
120 |
9 Pagos Lockbox 40 Pagos Crystal |
1 Cassie Earring |
Lv. 40 Ameretat | None (0%) | |
| (Lv. 35) Louhi on Ice | (X:35.7, Y:18.7) | 825,626 |
120 |
9 Pagos Lockbox 40 Pagos Crystal |
1 Louhi Card 2 Louhi's Ice |
Lv. 40 Val Corpse | Bright (50%) |
Happy Bunnies
Completing an elemental conflict FATE with a sufficient rating will cause a Happy Bunny to begin following you. They will give hints as to the location of buried treasures coffers each time you use a Lucky Carrot. This can be used as a key item or by clicking the carrot icon near the duty information UI. While you can use this item indefinitely, the item will only be in your inventory when they have the ![]() Down the Rabbit Hole buff, which lasts 15 minutes and is given from clearing the FATE.
Down the Rabbit Hole buff, which lasts 15 minutes and is given from clearing the FATE.
Using a carrot will give you a system message which will indicate the relative distance and direction of the treasure from their current location: "You sense something (distance) to the (direction)". The distance will either be "far, far", "far", none, or "immediately". The direction is always based on the true north direction in the map, not relative to where your character is currently facing.
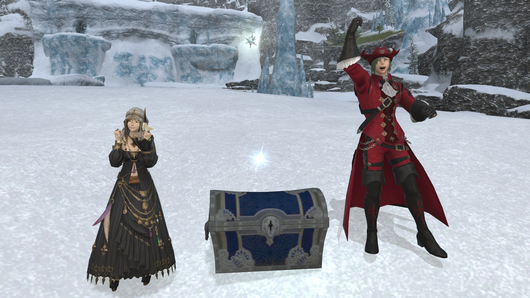
When you are close to hidden treasure, use a lucky carrot to uncover it. The chest will randomly be a bronze, silver, or gold coffer, each with a different drop table.
A happy bunny will stop accompanying you under these conditions:
- The hidden treasure has been found
- The Down the Rabbit Hole buff expires
- The player is KO'd
- The happy bunny is KO'd (avoid engaging enemies or participating in notorious monster battles if possible, or the bunny may be injured by AoEs)
- The player leaves Eureka Pagos
- The player logs out
In Eureka Pagos, the southern FATE ![]() Down the Rabbit Hole has treasure locations in the southern, lower-leveled region of the zone. The northern FATE
Down the Rabbit Hole has treasure locations in the southern, lower-leveled region of the zone. The northern FATE ![]() Curiouser and Curiouser has treasure locations in the northern, higher-leveled region of the zone. Most players will ignore the northern FATE due to the treasure locations being surrounded by high level enemies that will aggro to even elemental level capped players, making the treasure hunt a nuisance.
Curiouser and Curiouser has treasure locations in the northern, higher-leveled region of the zone. Most players will ignore the northern FATE due to the treasure locations being surrounded by high level enemies that will aggro to even elemental level capped players, making the treasure hunt a nuisance.
If you have the Down the Rabbit Hole buff but do not plan on seeking the treasure, remove the buff by right-clicking the icon. Otherwise, it will prevent the elemental conflict FATEs from respawning until it expires.
| Treasure Coffer | Gil | Materia | Notable Drops |
|---|---|---|---|
Eurekan Weapons
- See also: Eurekan Weapons and Eurekan Gear
Elemental Weapons
An upgrade to Anemos weapons. Weapons will have a new model.
| Item Quick Reference | Total for every weapon | ||||||
|---|---|---|---|---|---|---|---|
|
|
|
| Elemental Weapons (IL 370) |
|---|
| Weapon Tier | IL | Items needed |
|---|---|---|
| Pagos | 360 | |
| Pagos +1 | 365 | |
| Elemental | 370 |
How to acquire items to upgrade
- Frosted Protean Crystal: Collect vitiated aether by killing Notorious Monsters and level-appropriate trash mobs in Eureka Pagos, then turn it in at the Crystal Forge in Eureka Pagos (6.0, 21.5). You will receive one Frosted Protean Crystal for each full charge of vitiated aether.
- You must have acquired the vitiated aether kettle from Gerolt by completing the level 25 quest in Eureka Pagos and obtaining at least one Anemos weapon before you can receive vitiated aether. However, you do not need to have the weapon of interest equipped to obtain vitiated aether.
- The kettle can hold a maximum of 9 charges of vitiated aether. If it starts to get full, be sure to turn it in so none gets wasted!
- Pagos Crystal: These are acquired by killing Notorious Monsters in Eureka Pagos. The higher level the Notorious Monster, the more crystals it will drop.
- Louhi's Ice: 2 chunks will drop each time you complete the FATE
 Louhi on Ice with gold medal credit in Eureka Pagos, which requires you to kill the notorious monster Louhi. Louhi's Ice can also be purchased from the Expedition Birdwatcher for 50 Pagos Crystals each.
Unlike Anemos, there is no armor set to work on in Pagos.
Other Rewards
Achievements
This duty is associated with the following achievements:
| Name | Points | Task | Reward | Patch |
|---|---|---|---|---|
| Mapping the Realm: Eureka Pagos | 10 | Discover every location within the Forbidden Land, Eureka Pagos. | - | 4.36 |
| Making the Most of Pagos | 10 | Complete all the scenario quests within the Forbidden Land, Eureka Pagos. | - | 4.36 |
Images
The Optical Hat
Trivia
- "Pagos" is ancient Greek and can mean a mountain peak or a coating of ice, both of which are appropriate for this area.
- This zone was poorly received by players when released due to its punishing design, slow progression, and unintuitive layout. However, it has received several "nerfs" to streamline progession, although it is still generally considered the most time-consuming of the four Eureka zones to progress.

